


Supply List:
- Chunky Canvas
- Napkins – The Napkin Club
- Plastic Sheet
- Sandpaper
- Country Chic Crackle Medium
- Country Chic Simplicity
- Country Chic Hollow Hill
- Heat Tool (optional)
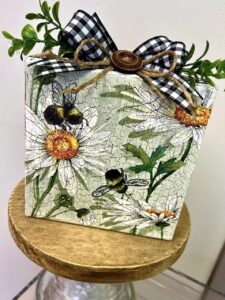
I am crazy for crackle, y’all! I’ll be demonstrating my favorite crackle technique, tips, and tricks that you can use with your napkin art. I’ll show you how I apply the crackle medium and add the prettiest daisy napkin art along with some other fun embellishments, like ribbon, twine, and a button. You will love this easy, crackly napkin art project that will look perfect in your home this spring!
Learn How to Use this Crackle Technique in Your Art
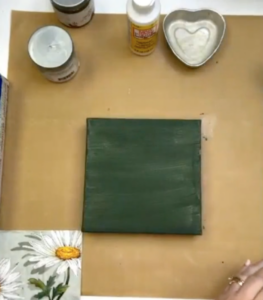
I am working with a 6×6 chunky canvas and two different paint colors – Hollow Hill (dark green) and Simplicity (white). You can use whatever color you would like, but I wanted something with a high contrast today. Tip #1 – your base color is what is going to show through the crackle.
I will start by adding a coat of the Hollow Hill paint color on the sides and front of my canvas. Let dry or dry with a heat gun.
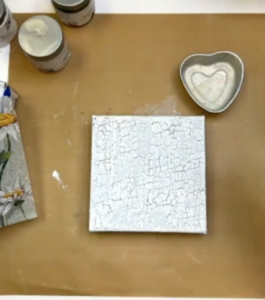
The next coat is going to be the crackle medium. Tip #2 – don’t ever shake it, you should stir it! This will prevent any microbubbles from ruining that crackle. Apply your crackle with a paintbrush on the sides and front of your canvas. I like to wait until my crackle is almost dry or completely dry before applying my top coat.
You need to apply this top coat carefully. The trick to doing this is to dip your paintbrush into the paint, apply from the top to the bottom in one direction. You can’t go up and down. I’ll apply this top coat with Simplicity (white paint) and the canvas will start crackling immediately. Let your paint continue to self-level and dry.
Add Napkin Art to Your Canvas
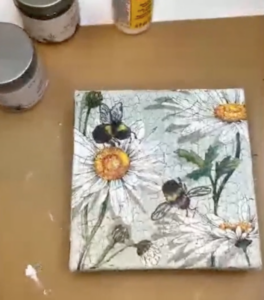
Next, we’ll be applying our napkin art! I have this pretty Daisy napkin (which my Napkin Club members will be receiving in this month’s bundle!) Cut a square off of your napkin and then separate your layers. This napkin is a 3-ply, so make sure you get down to your final layer with the artwork.
Apply a layer of Mod Podge Matte to your canvas. Place your napkin on top and take a plastic sheet over top to smooth the napkin onto the canvas. At this point, you can grab a chip brush and use that to pounce up and down to get that napkin into the nooks and crannies of your crackle. Dry with a heat gun and sand off the napkin edges.
Next, apply a top coat of Mod Podge Matte, which will seal and protect your napkin. I have some bees that I have cut out from another napkin that I will add at this point. Let dry.
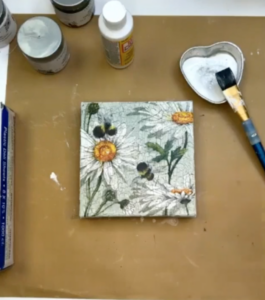
Now, we’re going to do some pen work! Some details can get lost in the transfer, like my bee wings and antennas. I’ll take my pen and just outline some pieces that I want to stick out more.
Finish Off Your Project with Fun Embellishments
Let’s finish this project up with some fun embellishments! I have some black and white checked ribbon that I’m going to add around the edge of my canvas. I’ll apply it with some hot glue. I’ll also add a pretty little bow with the same ribbon to the top. I’ll use some jute twine to tie it off and cut some flag ends. I’ll add some greenery sprigs, just tucked behind my ribbon bow. I also have a natural brown wood button along with some more jute twine and I’ll hot glue those to the center of my bow.
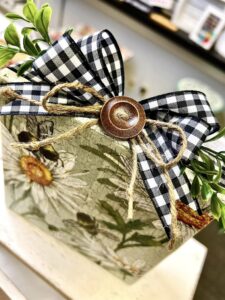
I love the way this turned out! You can enjoy this for spring, summer, or all the way into the fall.
I go LIVE on my Facebook page every Friday at 11 am CST for a fun and easy Craft-n-Chat Session. Come learn something new while creating something beautiful!
Join The Napkin Club where Unique Makers can connect, learn, and be inspired to create with the Individual Unique Napkin Collections that you will receive every month! A place where Napkin Lovers can unite and be inspired!


I need to.upfate my payment info.
Pam, please email cheryl@misstracycreates.com for instructions on how to update your payment method.
Love it!